It was About 8 or 9 months ago that I posted my first video using my Netduino powering a Tamiya Tracked Vehicle Chassis Kit. After that I actually did a little more work on the project, but I never posted any video or updates for the project itself.
Last week I was asked if I still had the project, and would be able to bring it to the Maker Faire. I thought, sure thing! So I got to work making it actually do something a bit more than going in a very long slowly arcing circle.
V1.5 (if you consider the video linked above v1) actually had a piece of plexiglass as a base, sitting on some standoffs up off the wooden base of the Tamiya kit. But it was my first time working with PG and I ran into a couple of issues, I drilled holes and they weren’t right, so I drilled some more, and they still weren’t right, the "rectangle” was off center on the vehicle itself, and I never even got around to taking the protective coating off the plexiglass. I did mount a GoPro camera on it, using zip ties, and drove it around the office scaring the pets, but never published that video, or even took pictures of the setup.
Thursday evening I decided I would try to take the motorshield I was using and make it work with the Netduino Go. Unfortunately due to a bug with PWM in .NET MF 4.2 qfe1 (or whatever is currently release) I was unable to get the Go working, so I wasted a full evening of time.
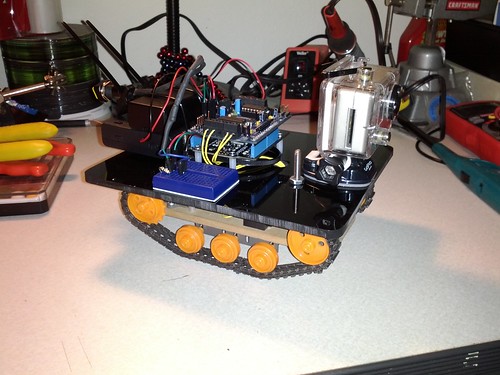
Friday evening I got to work getting the original Netduino going again, along with the motorshield, and a new piece of plexiglass. The end result was the photo seen above, a cell phone picture taken at something like 2 in the morning Saturday before Maker Faire, so I apologize for that :D
I ended up doing a little bit of coding, on the project (all sample code is hosted on Codeplex, at the time of this blog it is using Changeset 67198 (motor test project). I didn’t add a bunch of logic to the code, it basically has 4 programs, one that spins, goes, and repeats. Another that just spins. Another that goes forward then backward, and finally one that doesn’t do anything (stop). You can trigger through the programs using a button that was wired into the breadboard. Not the ideal setup, as the button was hard to get to while it was moving, but it was 2am and I just wanted to finish.
I made the programs fairly short because I figured that the area where it would be displayed wouldn’t be very big, unfortunately even with the short programs there wasn’t any way to safely have it running during the Maker Faire, so it for the most part remained unplugged the entire weekend. But it looked cool!
Speaking of looks, I took another piece of black plexiglass and cut it, shaped it on the belt sander, and then took the drill press to it to create holes for the standoff mounts, and somewhere to mount the Netduino/Shield to.
I also stuck an old (think original AAA battery powered, pre HD/960) GoPro camera to the front, this was all for show at this point, there was no chance I was going to get it wired up, and I really just needed the weight up there to keep the nose down. The back end was rather heavy due to the two battery packs, one for the Netduino one for the Motorshield, and it wanted to ride a wheelie without the camera up front.
Update (before I even posted the original blog) I stuck the GoPro 3D Case and two cameras up front to shoot some video and photos, you can see them below. This setup weighed the front end down heavily, and also, on a rough surface (bricks outside) started to cause problems for the tracks, I haven’t tried to figure out why yet, but they were coming off pretty regularly.
Here’s some video of the Netduino Tank in action, though I promise you it isn’t all that fancy yet 
and then of course 3D Video of what it sees (you’ll want to wear red/blue glasses for this one, or turn off 3D on youtube)
s
Photo Gallery
Parts List (quantity)
- Tamiya Tracked Vehicle Chassis Kit $20 (1)
-
-
9V Battery Case (1)
-
AA Battery Case 4-AA (1)
-
-
-
Plexiglass platform
-
Long screws (4)
-
Nuts, for above. (4)
-
Aluminum spacers, mounted between base and platform (4)
-
Small breadboard (1)
-
Heat shrink
-
Solid core wire
-
-
-
Plexiglass sheet
What’s Next?
1) I would like to add some sensors to it so that it can move around on its own a bit, and know when it should turn around.
2) I’d like to get the Wi-Fi-bac for the GoPro Hero 2 setup, whenever it comes out (this summer) and mount a Hero2 up front so I can stream video using the camera. This wouldn’t actually wire into the Netduino in any way, but I can imagine putting the GoPro on a servo system so that the Netduino could at least “point” the camera, at what, I don’t know yet.
3) It needs either a remote control (DotNetNuke module) and Wifi access or some other wireless access to the tank and send commands.